Take Better Pictures by Understanding Light
Let there be light!
Obviously one of the key ingredients for making a photograph is light.
Without light, we cannot take the pictures we want to make.
For our purposes today, we are going to discuss the light that falls on your subject. Your subject may be a landscape or a person. The quality of the light and the position of the light source determines how you use light to make your picture.
What does your camera see?
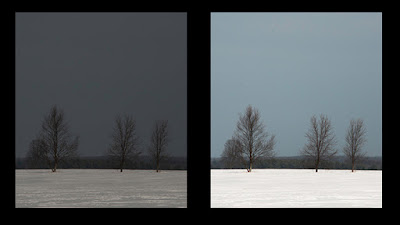
Remember when you took a picture of a beautiful white snowy landscape? If you made no adjustments, what you got in your picture is snow that looked a bit gray. That is because the meter was trying to deliver 18% neutral gray. The picture on the left below was shot normally. Notice how gray the snow looks. The picture on the right was taken compensating for the snow. The snow is whiter and more natural.
So what do I do?
Well remember the special shooting modes on your camera? One of them is likely to be snow scenes. When you select that mode to shoot snow, your camera will compensate for the 18% effect to give you the proper exposure.
If you are shooting a DSLR, you can over expose to compensate for the 18% neutral gray effect.
What kind of light will we deal with outdoors?
The conditions you are likely to encounter are:
- Diffused light. This is the light you find on a cloudy day. There are no harsh shadows with this light.
- Direct light. This is the light you find on a blue sky day. There are likely to be harsh shadows with this light.
Diffused Light
On cloudy days, you have a very different light quality. The light is diffused. You do not have the huge contrast issues that you have on a sunny day. Here is an example of a picture shot in diffused light. Notice there are no bright spots or harsh shadows. The overcast sky diffused the light.
Just because it is overcast is no reason not to go out and take pictures. Light on cloudy days generally give you a better saturation of colors. This is especially important if you are doing flower pictures.
There are some drawbacks. First, the light is not as strong so you are probably going to have to adjust the Big 3 (ISO, shutter speed and aperture). This could have an impact if you want to take action shots such as a football game.
For sports, you need a faster shutter speed and a higher f-stop. That means you need to increase the ISO. With the higher ISO your camera will be more light sensitive. This is another case where your camera probably has a “Sports” special mode. This mode will compensate the Big 3 to make sure you take the pictures you want of the football game.
Direct Light
Think about the light that falls on the earth when the sky is clear blue. Here is a shot on a day with clear blue sky and the sun shining. Notice the brighter spots and the deep shadows. The sun is high in the sky so the shadows aren't too bad. However, later in the day the shadows would become more pronounced.
On a bright sunny day with a clear blue sky the light is very harsh. It can cause high contrast between the brightest part of the scene you want to shoot and the deep shadows. Your camera exposure meter goes crazy.
What should it expose for? The light area or the dark area. If you expose for the light area, you completely lose detail in the dark area and visa-versa.
One thing you can do is to recompose to avoid the mixing the very bright areas with the very dark areas.
If you are more a experienced photographer, you could put your camera on a tripod. The tripod will ensure that each picture you take will be the exact same composition. First, take one picture exposing for the very light area. Then take another picture exposing for the dark areas. And finally take a picture using your camera’s normal exposure.
You can take these images and blend them together in post production using software like Photoshop.
Use the sun to your advantage
The secret of taking pictures on a sunny day is to use the sun to your advantage.
For example, if you are taking a picture of a building or a landscape you need to go to the location at the right time of day so you can get the quality of light that you need to make a great picture.
You can go in the morning or the very early evening to get the best quality of light. If you shoot midday, your light will be rather harsh.
If you are taking a picture of a person, you have much more flexibility. If you are forced to shoot midday, you can always move your subject into the shade. Or, you could shoot them with the sun over their shoulder and use the sun to highlight their hair. You could put the sun behind them and use your flash as a fill flash to lighten the face.
Here is an example of a bright light behind the subject. In the picture on the left, the meter to reads the bright background, which puts the subject in silhouette. In the picture on the right, I added a fill flash to make the light level balanced between the background and the subject.
What about low light situations?
If you are shooting in low light situations, you need a tripod. At some point, there is not enough light for hand held photography.
For example, if you are shooting a house decorated in lights for Christmas. Yes, you may be able to take a hand held picture, but it is likely going to be blurred. That is because the shutter speed has to go so low in order to make the picture.
Yes, you could increase the ISO, but when you do, you can introduce noise in the picture. You may not be happy with the results.
Flash or No Flash
The flash on your camera can illuminate your subject. A flash is not just for indoor or very low light situations.
You can use your flash during the day. In this case, it is acting as a fill flash. Using it as a fill flash can help you enhance your photograph by reducing the difference between the brightest part of your picture and the darkest. We saw and example of this earlier in this post.
If you are taking a picture of a person under a clear blue sky, a fill flash can eliminate shadow areas on the person’s face caused by the harsh sun. We have all seen the raccoon look. The flash will lighten the dark areas and give a more pleasing look.
So what does it all mean?
The more you learn to understand light, the better your pictures will be. Learning to use the light that is available to you, will increase your success rate at taking better pictures.
See you next week!
If you wish to see examples of my photography, visit my website at


Comments
Post a Comment
Thank you for your comment.